I have been working on lighting for a while now. First of all I would like to thank Darkstrider who has been huge help about lighting and using Lumix FZ50. When I first started, I did not know much about lighting a stop motion set. Now, I have some ideas about which lights I would need, how to setup those lights and which other materials I may need to achive a good lighting. Next comes using the camera to “take” that shot correct. So, a lifelong homework… experiment different lighting setups and try the best camera settings.
Let me start with the short animation test I made: -see above-
As much frames as possible I could get with a tripod. What do you think?
Lighting:
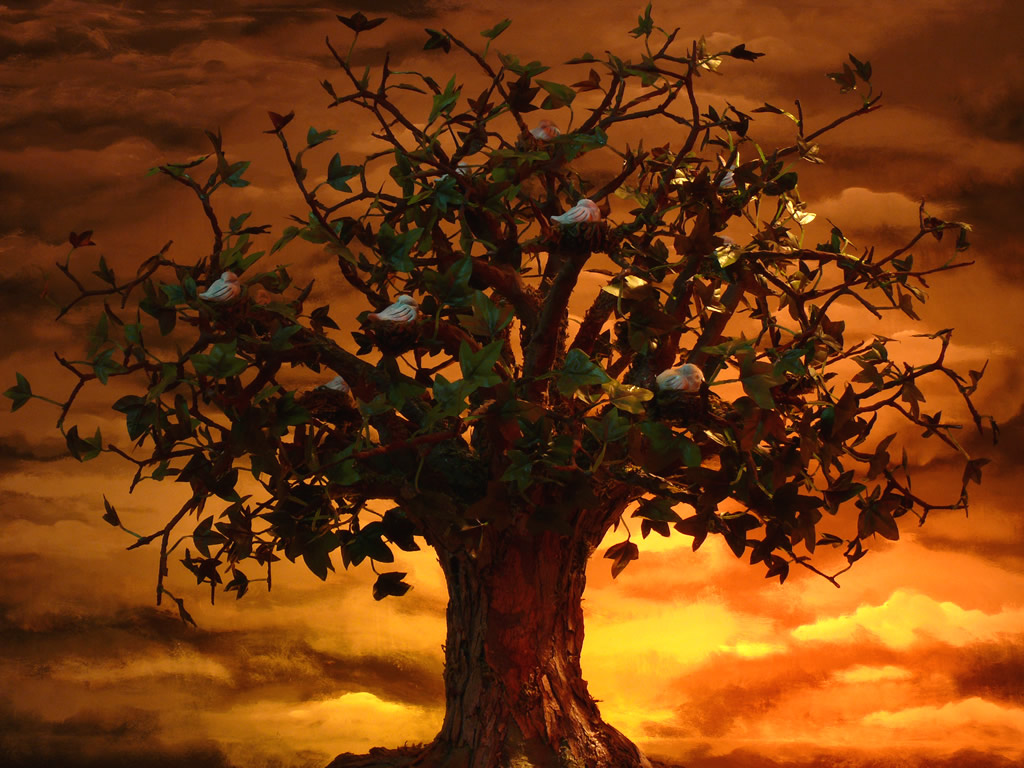
To get this sunset like lighting the idea was: orange as key light, blue as fill light, red and blue as back light. I did not want to get an exact sunset look. Some time maybe right at the end of sunset.. little more darker and I wanted to add another light from the top right maybe as a moon light. That time of the day is too early for a moonlight but wanted to have that light there… Here is a picture of tree as a whole. You can click picture to enlarge.

And almost forget to write; I painted another background. This time a black and white sky. I will not use this in the actual film either; just for testing.
The most amateur lighting setup I have here. There are 5 lights. One regular house light on the right side as a key light. First covered with baking paper and then yellow, red (to get orange) transparent kite paper and then black crepe paper at the top to adjust the light intensity. A blue pin spot on the left as a fill light with baking paper as a diffuser and hanged on an umbrella stand. Between background painting and the tree, at the bottom; there are 2 back lights: one red pin spot with a baking paper diffuser and one regular small house light covered with baking paper and yellow kite paper. On top of these 2, there is a black crepe paper again. There is another transparent pin spot on the right back with kind of a gobo made with a black tape. I used a broken tripod to make a stand for this spot. This kind of setup can not be used to shoot the actual film for sure but worked very well for me to test some lighting ideas.

So, this is what I would do for my film set in terms of lighting: I will buy some better lights. Nothing like fancy expensive ones.. Maybe a spotlight and then make some barn doors etc,.. There are some great ideas both Mike Brent gave me also I read on stopmotionanimation.com I might use these pin spots; only need to make some flicker tests. I will definitely buy color gels and also ND filters. I tried to make substitues for these but no way to adjust light as the way I need and also using materials like kite papers are dangerous.. you know those can burn easily and should never be left for long times while the lights on.
This film is going to be dark. I want a very dramatic look. I have been thinking about even shooting black&white. There are some tests below here:

See the black and white one on the second row. Here I tried to get a “Dore Lighting” (another great information from Darkstrider) Picture quality is not very good but I like the dramatic light change on different parts of this picture. Again, you can click picture to enlarge.
Using Lumix FZ50
This has been the first time I have really tried Lumix on animation. It works pretty well. Even though I had those funky lights I almost did not get any flicker. Just a little and I think it is because of the regular house lights I use. It took me for a while to really understand how this camera response different lightning setups. I heard people saying that Lumix does not work well under low light conditions… Nonsense!! As long as you adjust the shutter speed and F stop correct; allowing long exposure times; camera works great. The only problem I could not get over was the noisy picture quality in full size. FZ50 can shoot 10mp at 4:3 aspect ratio and 7mp in HD. When I view the 10mp picture in full size, I see the noise. But, I never need to use that 10mp one in full size. When I make the picture smaller I get a full high quality picture for my film.
The most impressing thing for me to see how “focus lock” feature works great. You know, you need to use everything manual when you shoot stop motion. I was curious to see how Lumix stays in focus in manual focus mode. You first manually adjust the focus and then hit focus luck button. Then voila.. you have a focused camera even if you turn it upside down.. kind of like what i did here to shoot.
Here are the settings of my camera during this shooting:
ISO 100
F stop 10
Shutter speed 5sn
White Balance: Tungsten
So, again thank you Darkstrider for helping me out for the right settings! Also my friend Mert here showed me how to adjust some settings and was very helpful.
Animator HD Personal:
This is the software I am using to shoot stop motion. My previous tests was without live view (with Canon) and I am suprised to see how much a frame grabber makes things easier. Lumix connected to PC with a converter sending live feed to Animator HD. Taking 2 pictures for one frame; one from AnimatorHD and another with a wired remote from camera for full resolution picture to be stored inside the card.

Camera Movement:
I shot these frames using my new tripod with a 3-way adjustable head. I knew this was not going to be smooth enough but wanted to use before I make a slider for the camera. I am not after a very smooth animation but definitely want to achieve something better than this. I also tried ease in/out but no way with this tripod. Hey I am also learning how to animate 🙂 Stop motion… a complete challenge for me; learning, learning, learning… how nice!!
So, I need to plan scenes carefully and make a camera slider.. maybe couple sliders for different parts.
——————–
And as always, here is my little bunny woke up around 4 in the morning while I was working on lighting. Came to my room with her “kuzu” (means sheep in Turkish) in her hand and said that she wanted to make a film too 🙂 Then suddenly she decided to be an actress and here is the result…

26 replies on “Camera Move Test, Lighting, Lumix FZ50 & AnimatorHD”
omagawd omagawd omagawd, Yaz! Looking so great! Loved seeing the moment of life in Chronos!
I can’t believe how you were able to take Mike’s magic information and translate it into such great lighting effects! Fantastic! That Dore lighting shot really really does have those amazing shifts of atmosphere to it.
I love that you are now pulling ahead of me with your Lumix and lighting understanding because now I can learn from you!
That sky painting is sheer heaven. You know I’m going to suggest that you actually use that one. I can’t envision anything being possibly better ever. It’s so hand painted yet realistic yet emotional, etc.
And Zeynep is about the cutest thing ever. She’s going to grow up and be a late night film maker like her mama! So sweet! Swoon.
Wow!!! I agree with everything Shelley said… those pictures of the Tree of Life look amazing!!!! I love that it’s not entirely realistic, but has realistic details. And the lighting you’re getting using kite paper (Kite light?) is excellent already! One thing I’d like to suggest… you said you can’t do a film using a light setup like this. I think actually you can… unless you were referring to the flammability of the tissue paper. Yeah, that might not be a good idea if you keep the lights on for long periods. But if you’re referring to your cobbled-together light stands, I think you could absolutely do a film using them!!! I’ll see if I can find a clip on YouTube from the end of Frank Zappa’s Baby Snakes DVD showing him talking to Bruce Bickford in his studio… his lighting setup cinsists entirely of sticks of wood tilted against each other haphazardly like some kind of crazy indian teepee braces and held together with tape!!! He builds these intricate playground contraptions like children climb on (they’re called Jungle Gyms here, not sure if you know them by that name?) over his sets (made from cardboard). And it WORKS!!!!
I’m so glad (as Shelley said) that you were able to get so much from our rather lengthy conversation about lighting and the Lumix (and all the other territory we veered into along the way!). And I want to thank you as well… I took a lot away from that conversation myself.
I’m really looking forward to any more images you pot from the making of this gilm… and of course to the release of the film itself!!! You’re quite an artist!!
Oh, and Im not sure if you know about the Manfrotto 410 jr geared tripod head? Hmmm… I probably already mentioned it to you. When I first saw your pictures, I thought you had one… your tripod head looks very similar but I see it isn’t geared. I have the 410 jr, and it’s incredible. Many animators from the message board use one… it allows really fine control so you can get delicate ease-in and ease-out on those pans and tilts.
Actually I just watched your tree test shot again, and it’s pretty darn good!!! The movement is smooth enough I think, it just needs a bit of ease-in and ease-out at the ends of the moves. Possibly you could break the shot up in editing software so the beginning and end of each move is a separate shot and then you can slow them down a bit… maybe even break them up further into smaller and smaller pieces as you approach the stopping and starting points of each move, so the slowing down and speeding up can be gradual… hope this makes sense? I don’t know how well it would work. But it might be worth a try. Alternately you could also try doubling frames and tripling or even quadrupling some of them near the beginning and end of each camera move to slow things down there.
Hey Yaz,
Strider’s absolutely right: there’s no need for perfect equpped lighting – you indeed already archieved great atmosphere with your setup! Most of the time I’m jusing simple desk lights and this professional coloured gels. This works great, too.
My favourite setting is the left one of the second row. The colours there seems to be pretty dark and to me they imply black and white atmosphere (like the old hand-coloured photographs). It’s very delicate and doesn’t look as much old-school (like Hitchcock, i.e.) as the real balck and white does. Do you know what I mean? I’m not an English native so I sometimes lack the right words to clearly explain what I want to say…
wow! Now this is what I have been waiting to see! This looks really really good. I am so glad to see someone working on a small scale like this too. I have such a small space at home, and not a lot of cash for lights. and I was not sure how that was going to pan out. But here you are nailing it with both those restrictions. Very inspiring. woohoo!
-Shelley,
Thank you sooooo much!! Yes! moment of life in Chronos… There is so much to do but seeing my tree through Lumix and now on YouTube really feels good.
Dore lighting shot: I really like that one too. I love black & white. But not sure about either shooting in color or b&W. Maybe some parts colored and some others black and white..
Lumix and lighting; I do not know much yet but I would love to share with you what I have been experimenting.
Sky painting: It is great to hear you like the painting. Unfortunately, it is too small to use as a sky for my set. There would be clock part and also some rocky surface around. I was only able to shoot tree alone using the whole background behind. I need to make another painting a lot bigger than this one. I remember your huge sky setup. I need to make something to cover the whole wall behind the table and maybe some extending to the ceiling. Or maybe using bue screen.. I dont know.
And Zeynep 🙂 thanks!! Who knows maybe I am making stop motion for her.. Maybe this is her path and I am just guide here as a late night film maker mama 🙂
-Mike,
Thats great to hear you like the pictures of Tree of Life, my teacher!!! Do you really think I can use this kind of setup for the film? Kite papers are some transparent, colored, very thin nylon papers I bhought a while ago to make a kite for my daughter. Those are not called kite paper but I didnt know how to call those in english. Those are the papers students use to cover their books, etc,.. Those are great for coloring the lights because very transparent but at the same time very flammable. While I was working on lighting I tried to never leave the lights on when I left the room. It is kind of stressful. My pinspots are 30W only.. not heating much but the one I used as a keylight is 150W and made the papers very hot. Anyways, I think I understand what you mean. Did you get chance to look for the end of Baby Snakes DVD on youtube? I have just searched on youtube and google but could not find. It sounds very interesting.
I am still reading your blog posts when I have time. There are so many posts with a lot of info about everything stopmotion. Thanks!!!
Manfrotto 410 jr.. unfortunately I do not have one. Mine is a lot cheaper we bought couple months ago. I thought it could work fine but that head is not good at all for small movements. You know there are 2 circular parts (i dont know in english.. circular parts with numbers for precise movement) of mine like Manfrotto but when I turn the knobs thats parts also turn 🙂 So, I made some rulers on masking tape and pasted over. But those did not help much beacuse it was not possible to turn tiny amounts. Anyways I would make my own camera sliders and wont need to spend more money on these hopefully.
Mike, great ideas about editing this video for adding ease in and out. I use After Effects, I tried its built in ease feature but could not get a god result. Let me try what you said here.
Jessica!
Thanks for stopping by and commenting here.
So, maybe if I only buy some gels to color and some filters for adjustment then I can work with my current lights? I will try this before buying new lights.
Picture left one on the second row: I like that one too and totally understand what you mean. Your english is perfect! I usualy get a feeling of not being able to express myself in english too. As for that picture; I like it too but it gives me that “edited too much in photoshop” feeling. None of these photos are edited in photoshop; right from camera to the blog, only resized. But that one and some others did not look natural to me.
Thanks again! Lets keep in touch.
Hi Rich,
Great to hear these are all inspiring to you! Yes, having a space for stop motion is important. I dont have a basement and we do not have a very big house. I have been trying to find a good spot in our house. Today, we have changed rooms again. This is the third time I am moving all of my equipment to another room. Hopefully this is going to be the last move. This room is now bigger than previous. You can see in the pictures that room was as wide as my set table. You can definetely shoot in such small room. Just make sure to make the set pieces and your puppets small. My set is going to be bigger than I planned. So, needed a bigger space. Good luck with your stop motion project. Let me know how it all goes. Best-
Hey Yaz!
I wrote you a big post last week and it didnt go though…….???
ohh well….the test looks awesome….and You are a total NATURAL!!!!! this medium is
all yours…
jriggity
Hey Justin,
Actually your post did come through. You posted under the previous post here accidentially I think. Your message is in the comments section of the post “The Invasion…” I replied your message there.
Thank you for coming back! Your support here is very important to me!!!
Wow, the tree looks beautiful! Great use of the lighting – I love how many moods you were able to get from the different coloured shots. I love watching trees rotate as you go by, and your camera move caught that – really smooth actually! And Zeynep is adorable! 🙂
Hi Emily, thanks for stopping by and commenting here. It is great to hear you like what I have been doing!! Best-
m_) That tree is so precious, and am so honored to witness all your progress! —Keep up working hard. You are officially now in my links 🙂 thanks for taking your time to get me a banner.
m_) Hope your days keep productive, you inspire me like you have no idea how.
m_) Maybe you could zoom in and out the tree to show more mistery, if that is what you are aiming at.
Hi Dan, I have been travelling and just had a chance to read internet in detail. Thanks a lot for your nice comments here!!! Also, great to see my banner up on your website. Thank you!!
Zooming in an out… yeah I will do that and ofcourse I will try to have a lot better camera movement for the film. This was just a test done with a funky tripod head. I will make some sliders for zooming in and out and turning.
where you to Yaz! I crave updates!
Will.. yeah I have been away, I know… I have been working on the scenario of my film. I wanted to change it a bit before I moved forward. It is almost done and I will be back with new updates soon. Thanks a lot for checking out!!!!!!
Hi Yaz,
I’m new to comment, but I just had to when I saw these shots. SO beautiful.
Was wondering what material you used to paint your sky background on. Also what kind of paint did you use? SO amazing. You are an inspiration!
Hi lepetitdoodler! Welcome to my blog 🙂
Background painting is acrylic on canvas. I made the canvas here by covering white cotton fabric with wood glue. You know, it is regular oil or acrylic painting canvas.
Sky is all gray, black and white. I used a sponge to paint these clouds. No brush here. Just big sponge. Painted from darker color to lighter ones. Dry painting with white was the last step to get the fully white sections.
To be able to “paint” with the colorful lights, I did not use any color on the background rather then grays, whites, blacks.
Thanks again for checking out my blog. Best!
m)( HI there, its been a long long while long, and so I thought I could drop some lines.
m_) Hope everything is going great there with your projects.
Dan
Hi Dan, Thanks a lot for stopping by. I am back here 🙂 and have just posted some pictures of Adem. I hope all is going well with you too.
Looked at your work for the first time 10 out of 10 you must be very pleased.A word to all those
who have bought the fz50, stick with it and your results will improve if you put the effort in as we can see with this top class animation. I took the tests by the Royal Photographic society with my lumix and boy am i smug. Keep on your are doing fine work.
Hi Mike, thanks for stopping by and checking out the process of my film here. Yes, I understand what you mean. I am used to using Canon for still photography and getting used to Lumix is taking some time. Thanks for the encouragement here! It was little easier for me to adjust Lumix when I used couple days ago for a walk test. But still I need some more experience with it for better results. Thanks!
I love this site!
How did you make the tree? I want to make really realistic trees for my diorama scene and some tips would be great. maybe oak trees?
Hi Adam,
Thanks for visiting my blog and your comment.
You can see my posts about making of the tree here: http://www.yazsfilm.com/?cat=5
In short, I used wire to shape the trunk and brances. Covered branches with newspaper and then masking tape. When I was happy with the shape of tree, I covered whole first with foam glue and then wood glue-plaster mixture. Painted with acrylic. I made leaves one by one by cutting some fake leaves got from florists and painting each. I posted everything in detail and you can those posts through the above URL. Let me know if you need more information about any of the steps.