Another long time with no post and this time I am back… Actually it has been some time since I started working on Chronos again but I wanted to post when I am ready. So, it is about time…
While I was away, we moved to a new house. I did not have a real room to shoot this film so I looked for a rental to make a studio. A cheap place, a barnhouse.. somewhere we can turn into a daytime studio for my film. But, we could not find it. Long story short, I decided to turn a little space here on the roof into a stopmo studio for shooting. This meant Chronos to be a different film. Such a small place for my actual set… It took a while for me to accept this idea. Changing scenario, shooting something else around the same idea… As a “dear friend” said -who has been very suppotive all through the hard times I was going through- maybe my film was born to be something else… Anyways… I have been working on scenario for the last two months. Papers of ideas, different scenarios… As a result there is no real scenario starting from the beginning and ending somewhere. Instead I have some scenes to shoot, to improvise if it is the right word. Actually this fits very well to the life itself. Life we spend in time! Now, there is no big clock. I removed it completely. I will have kush, tree and Adem. Will shoot each seperately and then put together later in the post. No blue screen. Just different scenes coming one after the other. I have some ideas to make it continuous but I will decide when shooting each. I will see how it will turn out. If it does not turn out well; I will be happy because I will leave with such a powerful experience of shooting a stop motion film for many years 🙂 If it turns out well then I and maybe you will enjoy watching couple of minutes of stopmotion film. Both worth trying huh?
So, in this house now I have a space to make props, set, etc.. in the room where we do our web design work and I have a studio in the upstairs for shooting. The other day, while I was trying to setup lights I thought about the places I tried over the last 3 years. In the last 3 years, we moved 3 times. I started this film in a house and then we moved. In that second house, I moved all of my stuff in between different rooms 3 times. And we moved to another house -third one- last summer. This time, while I was settling down with all my stuff I felt really tired.. At the beginning of this film adventure I did not have many things like paints, lights, small and big things.. you know. But, over the time I collected a lot. Now I have many boxes filled with all different kinds of things. Now all settled down, ready to move forward. Ok, enough about my excuses…
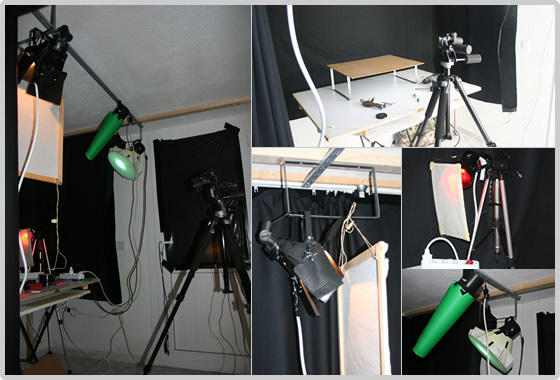
Here are some pics of my new studio in the upstairs. There is not any nail on the walls here. To prevent humidity, we need to be careful about putting nails on the walls here. Wood pieces supported with other wood sticks making something like a cage. And lights, curtains are hanged on the wood sticks. It is such a small place but the best thing is it being totally seperated from the house. A spot just for animating. I am still working on setting up lights; just bought some new stuff to hang lights and fish lines to animate some little things, etc…

I will probably replace that green paper cone with a black one. It serves as a spot light. The barn door light you see in the middle is the one I made out of coke cans (by spray painting coke can metal sheets in black) and a garden light while I was working on The Invasion. My turning table is there as a set table and the farest distance my tripod can go is the place you see in the pictures. Not much room to get a real depth. But any problem can be solved huh?… I have a very flexible story to shoot so I can change things anytime I have a problem just like the first scene with a floor turning into a room with walls around. My next post is going to be about this soon.
While I was away I also finished working on The Invasion. Montage was finished and I sent all to my sister for her to do final touches and make the sound. I did not update that film’s blog either. Will post some pics of shooting and part of animation there too.
 Two weeks ago there was a really serious flood here where we live. We were out of city for couple of days and it happened. Water was 2 meters high from the ground couple minutes away from our house. It was about 30 cm high here. Nothing happened to our house but many people lost their houses, offices, restaurants,.. I am so sorry for those people who are trying to recover… (Picture on the left is from the news on the net) The strange thing is the flood was very bad around the area I looked for the studio. If had found a place and turned it into a studio for my film and set everything there I would have lost all. My set, camera, lights, puppets.. were going to be all under the water. So, how would you call this? Fate maybe, maybe not… Again I am so sorry for all those people and I am grateful for not being able to rent a place in the fall past.
Edit: Adding this pictures to show the dept of field problem ( or shallow dept of field problem..) to Mike.

21 replies on “Just clicked on new post button after months…. I am back!”
YAZ!!!!
So goo to hear from you!!! It’s ben a long time!!
Wow, it seems everybody is moving into new houses these days… I just did the same myself… welcome to the neighborhood!! (Even though it’s not in the same physical neighborhood, welcome to “just moved into a new house and we’re internet neighbors neighborhood”)
Hmmmm…. Are you animating on that little table on top of the bigger table? Why not just use the big one? Or build a bigger ‘little table’?
I think you’d feel a lot better to see where I’ve done all my animation i the past, except for the few most recent ones… oit’s a little plank of wood clamped to the edge of a table… and actually I never even used the full length of the plank… I only have tie-down holes drilled in one end of it! An area actually smaller than that little table in your pic.
You could probably get the camera a little farther from the table if you go totally ‘corner to corner’, you know? Just a little farther. But you can get a lot of good shots from as far away as it is now and even closer.
Also, keep in mind… the little table might be the only place your puppets can actually walk around, but you can use the entire space for set pieces and backgrounds etc. I only walked puppets around on their ‘plank’, but I used to use the entire space of the big table sometimes for backgrounds.
Anyway, I’m so glad you’ve accepted the limitations of your new space!! I suspect you’ll be able to do more with it than you realize now. Play around a little… just put a puppet (opr something) up in front of the camera and take some pictures… see how big you can make the area seem, or how close up you can get… maybe do your film mostly in close-up… it can be a nice stylistic choice (and necessity is often the mother of invention, as we all know).
Hi Mike! It is good to hear from you too. I have been following your posts about moving, settling down, your new studio, lighting setup.. You know one of your many fans here! It is nice to be back in the neighborhood.
Animating on that little table on top.. You have got me thinking about it again. I did that little table for this scene I will be shooting at first with Adem dropping pearls from his hands. The little table I had handy here, made some test shots and decided using that for scenes like this one. No walking on this scene. I just need a good angle. After making the floor (which I will post about it today), I saw that there was not enough space to achive a good dept of field. I decided adding walls around. So, that little table on the top is going to turn into a room today. I am going upstairs right after this reply. Let me first see if I can make the room bigger. After shooting this scene I have some others require bigger space and I think about using most of the bigger table for those scenes.
Shooting corner to corner: There is a door going to the roof on one side and the other side which you can not see in the pictures is the stairs. I need to use both and looks like no way to place camera right on the corner.
Thanks a lot for the ideas and taking time to comment here. And I love what you said here: “Neccessity is the mother of invention”
You say you want a “good depth of field”… I assume you mean you want a lot of depth of field?
I’m going the opposite way these days, a shallow depth of field. It’s a much more cinematic look, and one of the strengths of a DSLR (or DSLR-like camera 🙂 ) over a video camcorder, which don’t allow a shallow DOF. As a result, a deep DOP tends to make people think it was shot on video.
Across the web, photogs and cinematog(rapher)s are excited about the new “DSLR cinematography:” that’s only now becoming possible thanks to the new DSRLRs that allow HD video (and of course the ability to string still DSLR images together to make stopmotion animation). The reasons… a much more cinematic feel in the color depth, the contrast, and the shallow DOF that the larger sensors of DSLRs allow – qualities that have been painfully absent from digital video and in the past were only achievable when using actual film cameras. Of course you don’t want to overdo it, that can make an image look miniature and a bit ridiculous. But when used judiciously, shallow DoF is a beautiful thing.
If you do want greater depth of field, the way to get it is to open your aperture up wide… smaller f-stop numbers mean a larger aperture opening which lets in more light. And also, of course, get the camera back farther.
Take a look at this – it’s one of the DSLR clips associated with the early period of DSLR cinematography: http://www.youtube.com/watch?v=Pco4OmpYSQo
Ok, Philip Bloom gets a little carried away… some of the shots are entirely TOO shallow, and I won’t lie… some of the infinite focu shots look great… I like the mix of shallow and deep. But some of those shallow shots are just gorgeous!! It reminds me of the 0’s films shot with the then-new Super16 cameras, which allowed professional results from a 16mm camera, which until then had been considered strictly an amateur’s tool. But as soon a the super16 format was created, it freed cinematographers to carry the lightweight, highly maneuverable 16mm cameras and to shoot “on the fly”, and it led to a freer, more spontaneous approach, with a lot of shallow shots and a lot of extreme closeups which weren’t used much with the more big and heavy 35mm cameras.
If you look around at other examples of DSLR cinematography, you might catch the fever the way I have for this kind of cinematography. And maybe you’ll come to appreciate the humble shallow DoF a I do!
Ok, sales pitch over! 🙂
I lied… a little more sales pitch…
http://www.flickr.com/photos/12579280@N00/5452705623/
This is a shot I took recently exploring the shallow DoF and color possibilities of the FZ50.
Mike, what I was trying to achive was to get the puppet and the pearls sharp and get back edge of the floor very blurry. Something like the floor getting lost into the black screen behind. I think this is same as what you explained by shallow dept of field. I am not good at terms at all and appearantely I did a mistake by saying I needed a good depth of field. I wanted things closer to the camera sharper and things away from camera to be blurry. Is this called as shallow depth of field? I have just checked out salton sea beach video and it is soooooo amazing. Favorited right away. How can I get closer to a quality like this one? The picture you posted on flicker is also amazing. I guess you placed camera closer to the puppet and the cave behind got blurry by adjusting aperture. I was not able to achive the look I explained above and I decided to put walls around. Let me post a picture here at the end of the above post to explain what I mean.
By the way I am now making the floor bigger. Just came back from upstairs and decided to make the space larger after reading your comment 🙂
Mike, I have just added picture to the end of the post. If you could check out and let me know, that would be great. Thank you soooo much!!!
Well, I wasn’t sure exactly what you meant by “good” depth of field, if you wanted it shallow or deep. But because you were trying to get the camera far back, I assumed you wanted it deeper. Luckily, to get a shallow DoF like in the pic I just uploaded, you want the camera close to the puppet.
Set your lens all the way to wide angle and place it close to the puppet. When you focus on him, the background should be blurry.
Ok, I just looked at the pics you added… yes, get up close to the puppet and focus on him… you should be able to get the background very blurry.
To see another great example of DSLR cinematography… here’s the first example of it… created by Vincent LaForet with a borrowed Canon 5d MK2 just before that camera was released (the first DSLR that included HD video): http://www.youtube.com/watch?v=a1Rq2KzoTSg
I’m glad to hear you’re interested in shallow DoF! You’ll be able to achieve that in that small studio. And I was just bout to ask if there was any chance of opening the window and placing the camera outside…. (no need if you want a shallow Dof!)
Wowooo… Vincent LaForet’s video is also amazing too.. It is unbelievale what people get with DSLRs.
I am going to try settting up FZ50 closer for shallow dept of field. I need both the puppet and the pearls to be sharp and only the back edge of the room blurry. This might be the problem. Maybe a bigger floor is a the solution. I will see.
Thanks again and it is really really great to talk to you here online. I wanted to stay away for a while to concentrate back into my film. Lately I have been feeling alone and now I see that I am not.. Thanks!
You’re welcome!! It’s good to have you back and working on Chronos again!!
One thing you can try to get that shot working… move him to near the front of the floor. Do you know how to adjust the aperture and f-stop on the FZ50? If not I can explain it.
Here’s another shot I just took: http://www.flickr.com/photos/12579280@N00/5453029843/
This is fun!
Mike, this one you took is really amazing: http://www.flickr.com/photos/12579280@N00/5453029843/ Puppets look great; sharp and crisp with blury rocks behind. I have checked out its exif data. http://www.flickr.com/photos/12579280@N00/5453029843/meta/ I think I know how to adjust aperture and f-stop in fz50. Adjusted using 2 roller buttons one in front of the camera and the other on the back, both on right side?? I need to spend time to get a better understanding about these 2 values. Being able to see exif data in flickr is such a great feature. I will experiment with the values you used. If you have time to explain how you achived the shallow dept of field in this picture, that would be great!
This is one of the URLs I have found about adjusting dept of field: http://www.cambridgeincolour.com/tutorials/depth-of-field.htm It looks like a good tutorial and I will check out.
I am just done with some graphic works. I will get some sleep and then try with camera tomorrow morning. By the way, I have a bigger floor now. I am sure it will make things easier for me. Adding walls around might be good idea and fun to make. Even if I can not make shallow dept of field in this scene, there are some others in my mind for which I will need blury background definetely.
I was going to post about the floor and this scene today but it would be better if I do it after working on dof.
Thanks!!
So great to read your conversation Yaz and Mike! Yaz those shots at the end of the post look fantastic to me. And the idea of spilling pearls I love.
I’m going to click through the links now in both your comments and also try to understand how to get better focus on my FZ50. Right now when I try it is not at all crisp. Will try to understand…
So glad both of you are back.
So sorry about the terrible flooding. So glad your equipment wasn’t lost. I do believe in fate and flow and trust and making our art with what we have.
Much love.
Hi Shelley! My “dear friend” 🙂 Thanks so much for your comment. I am very excited about the idea of spilling pearls. If I can get the look in my mind, it will tell the story. Lets see…
Mike’s posts has been very helpful. I will be working on shallow dept of field tomorrow. I understand you saying not being able to get crisp pictures with FZ50. I am not very good at that either. The more you use the more you get better you know. One important thing I have experinced about FZ50 while I was shooting with that: It needs more light than the other camera Canon we have. If you do not have enough light, pictures can get noisy. I remember Mike saying the same thing when I first got FZ50. Other than this I am learning from Mike.
I am so glad to be back too. It has been such a long time and talking with you and Mike about films make me feel great. Thanks for being there!!!
Fate and making our art with what we have…. These have been the latest lessons I have had to take lately…
Wait… I just want to clear this up so people don’t read it and get the wrong impression..
The FZ50 really doesn’t need much light at all… it’s true, the main reason you can pick this camera up pretty cheap on eBay is because it doesn’t do well in low light WHEN IT’S HAND HELD… but as long as you have it on a tripod or camera mount of some kind then you can take a long exposure and it does fantastic in low light!!
Yaz, you’re absolutely right about how to adjust the aperture and exposure time… the two wheels near the top of the camera. To get a nice shallow DoF in that shot you’re setting up, pull the puppet forward, you can put him right up at the front edge of the table if you want. Put the camera close to him… it can be probably a foot away or less (mmmm… I guess that’s about 30cm). A telephoto (zoom in) lens setting will capture a shallower depth of field than a wide angle (zooming OUT). So play around with how close the camera is to the puppet and how close you can zoom in… maybe a little farther back but zoomed in tighter would give a better effect, or maybe zooming out and placing the camera closer would look better… just experiment a little on each shot for that.
For focusing, when you touch the focus ring on the lens the Lumix will instantly cut to a close view of the center of the viewfinder. You can actually change the settings for that, you can make it show you different areas rather than the center, but I just keep it set up to show the center, which I believe is the factory setting. Ok… if your puppet is NOT at the center of the screen (it usually won’t be, central placement is static and rather dull) – you can either swing the camera sideways a little or actually move the puppet until he IS centered. Then you can use the nice close zoom view to get him focused exactly how you want, and if your depth of field is shallow enough, you can focus on just one part of the puppet and throw the rest of him out of focus if you want.
Once you let go of the focus right it will go back to the regular view, and you can put the puppet in his place and go ahead and put in his tie-down screws. Sometimes I have to keep re-adjusting the focus because I decide I want a little more of the background in focus or a want only the face of the puppet in clear focus or something. Again, it’s just a matter of playing around a lot and taking a lot of pics. When I’m doing this I have the camera plugged in and I’m looking at the image in Framethief so I can see it bigger than what you see on the little viewfinder screed on the camera.
Oh, and in case either of you aren’t aware (you probably are, I just want to make sure), when you press the shutter button halfway, either on the camera itself or on the remote, your exposure info will show up onscreen. Look att he indicator that shows your exposure… try to keep it somewhere near the center. It doesn’t have to be perfectly centered, but it shouldn’t be all the way to one side or the other (underexposed or overexposed). You adjust it by adjusting either then aperture (f-stop) or the exposure time. And of course, for shallow DoF you want a low f-stop number (wide open aperture), so set that where you want it and then adjust your exposure time to move that cursor toward the center position.
Thanks, Yaz and Mike, Stupid question 42, Mike, how are you hooking the FZ50 up to your computer for Framethief? You’ve probably said this, but I’m not tracking where.
You have to do it through the analog/digital converter… I use my trusty Canopus ADVC-100. Then you select it in Framethief as your ‘camera’.
Oh, and I just realized what you might be referring to Yaz… it’s true the FZ50 doesn’t get good results at high ISO settings. Just keep it at the lowest setting (100 I think) and use long exposure times. It probably is true that a real DSLR can get much better results at higher ISO settings. Sorry, I sometimes get a little defensive about the Lumix!! 🙂
Mike, wow, thanks! Very good info here. I am going to try right away.
As for Lumix and lighting condition; I’d better not try to explain things. Thanks for clarifying. I use wrong terms and I get misunderstood. Yes, it works great at ISO 100 and “long” exposure times. This was what I meant.
Hooray… going upstairs to try some shallow dept of field.
Thanks, Mike. Really helpful to see this info again here now.
Looking forward to watching your results, Yaz!
Hey Yaz!!
so glad your are all settled and safe from the floods….look forward to reading all your progress..
jriggity
Hi Justin, thanks a lot for checking out this post here. Actually this is a post from last year. I have not updated blog about Chronos since then. But,.. yes I have been working on this film for a while now. I wanted to stay quiet 🙂 I will start blogging latest in about a month again. It is about time..
Hey, Yaz. You probably don’t remember me it’s been about three years since I posted my last comment. Im really impressed by your recent work but I’ve found a new hobby. If you are interested in finding out what it is look here….http://anthonyspuppets.blogspot.com/
I’ve been doing the for a while now but decided to start a blog abou tit a few days ago.
i just find your website and i really like it !!!!