Finally, I am posting about how I made Adem. Although I have posted other things separately, this post is going to be a very long one.
Other pictures I posted previously are located here. And a walk cycle test is here to post everything all together about Adem.
I had a ball&socket armature made for this guy last year. I do not have much space for the set so, I wanted to make Adem as small as possible. But, as I was working on the puppet, I was not able to make him look like the way I wanted. I am glad I also ordered some additional parts in the first place. So, eventually I replaced his legs with the longer ones. You may notice in the following pictures; first he is short and then he gets taller as seen with the additions to his pants. Actually, making of Adem was such a long process because I tried many different things for everything of him like the way I cover the armature, clothing, head,… I was both trying different designs and also getting used to working with this armature. Ok, let me start:
The Head and Covering Body with Foam
There was a double ball joint on his neck. This is the way it should be for a proper movement. But, as I was trying to make him short, I saw that he was going to have a very long neck. After couple of tries, I decided to cancel one of the joints on the neck. His head is made out of super sculpey. I covered the part of joint at the top with epoxy putty after cooking some sculpey. Then covered all with sculpey and cooked again. So, there is epoxy putty inside sculpey. It seems totally working fine. They cooked well together in the oven. There is one drawback so far, I can not change the tightness of that joint.
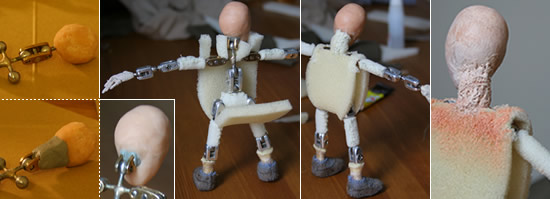
I covered some parts of the body with foam as it is shown on the pictures. I sewn the foam instead of gluing.
And neck.. that was another problem. Because there is a sculpey head, I was not able to use latex for the neck. Sculpey and liquid latex should not touch. I have learnt this recently after having a problem with the hands and claws which I posted about it yesterday. So, I just painted foam with acrylic to make the neck. He now has a short neck and it is looking okey. Also, I was not trying to make a total human like puppet and it was fine making the neck that way for me.
Clothing
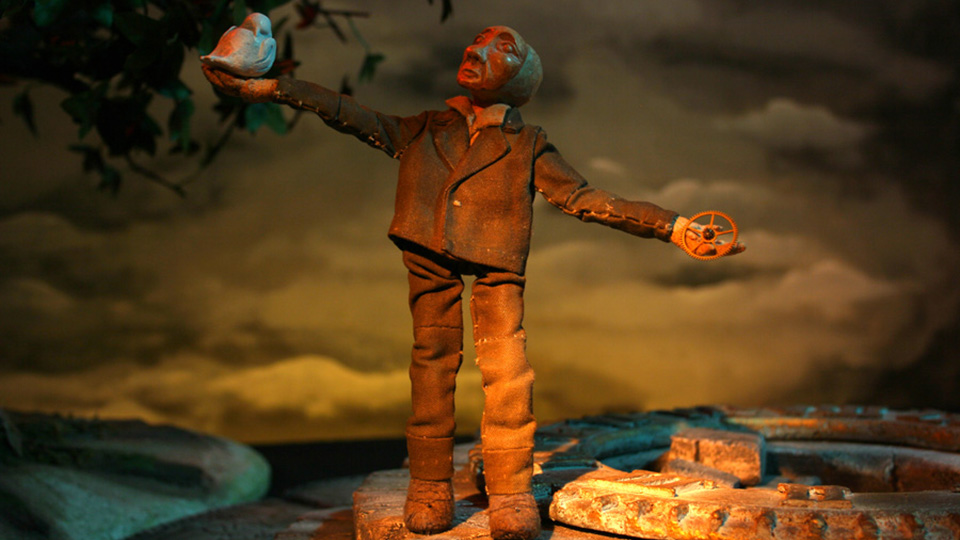
Adem in my film represents human being. Nobody special, no hero,.. So, I wanted to make ordinary things for him.
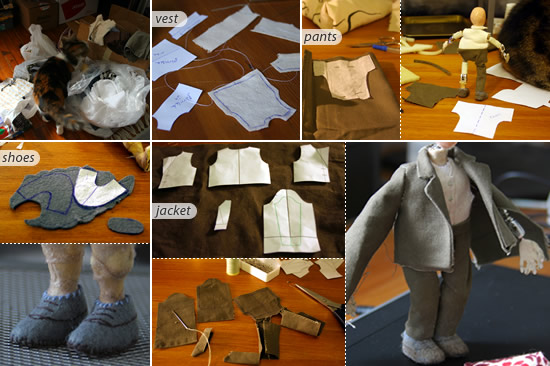
The first pic on the left top shows my cat having fun with a box full of fabric 🙂 Old clothes of ours and friends I collected over the years. The other pictures are self explanatory. when I was a child my mother used to sew clothes for us. She had a sewing machine. It was a lot of fun for me to watch her sew. By helping her out and watching her I learnt to sew some basic stuff. So, that was good for Adem. The vest and pants were easy but making of the jacket was kind of tricky. I googled for some mens jacket patterns. Then I created patterns for Adem’s by combining the ones I found. Just drop me a line in the comments section if you want me to send you patterns. I would be happy to do that.
Weathering
Although Adem did not like it, I had to weather his clothes to match the atmosphere. No place for brand new things in Chronos. Here is the part I most enjoyed doing:
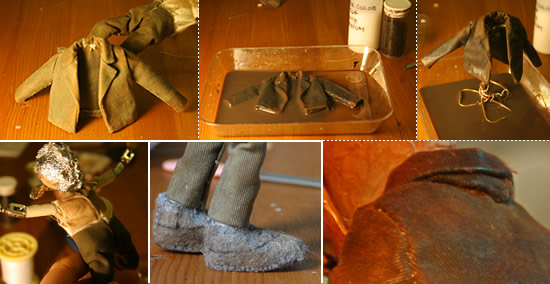
The whole technic and the materials are from Shelley Noble! She sent me so many great materials for my film. Here I used two of those; walnut ink crystals and matte medium as she described in emails.
I first bleached the parts like the collar of the jacket, cuff,… Not much, just enough to give some shading. Mixed well acrylic matte medium, walnut ink cyrstals and a little water in a plate. Dipped the jacket. And then left it hanged overnight. As Shelley said it changes color as it dries. I applied same mixture to his shoes and vest. Just some with a brush and left for drying. I love the effect here. There is a closeup pic to his jacket at the bottom right. Thank you Shelley!!!!
Hands
Since I had problem with the hands I previously made, I am not going to post details about making of these hands here. There are temporary hands.
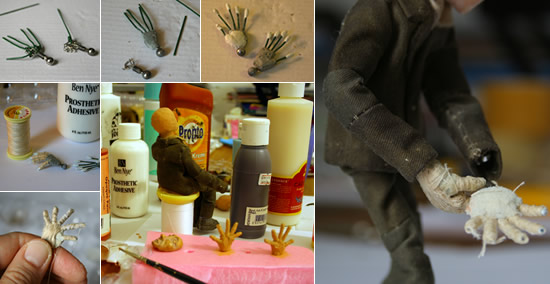
I painted with PAX here. You can find details here in my previous post. Even if this paint works fine (which I think so) I will make the hands again beacuse I am not totally happy with the design. I dont want the hands to be totally realistic but I want little detailed and thinner than these ones.
Mask
Adem has a real face like we all have. In the film you will see him both with and without a mask. But, he wants to hide his real face until the film is completed. I wanted him to wear a mask on some parts of the film like every human being does in her/his life. Dont we all have many masks… How many of us have seen our own face?…
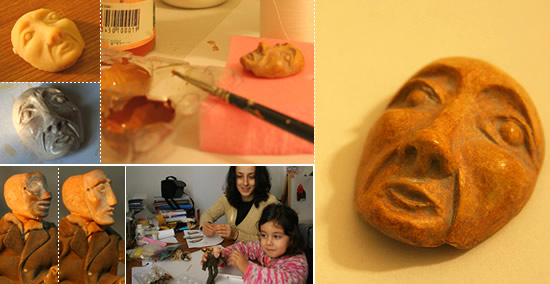
I made 3 different masks and decided to go with this one. Actually this was the first one I created. The other 2 you see on the left bottom were based on real shaman masks. Design of this one was totally came out of my mind. I took a piece of super sculpey and started making. No sketch, no reference pictures… I did not want the mask to have any expression. Not happy, not sad, not angry,.. So, in a way something holding all different expressions of a human face in one mask. Not a man, not a woman.. just a human.
This is how I made the mask: First cooked the sculpey mask and then painted couple times with acrylic. When you paint acrylic directly onto the sculpey with a brush you may get some scratches. To get rid of those scratches after one or two layers of acrylic paint, I applied one coat of acrylic primer and left it to dry. Then couple more acrylic layers. When I was satisfied with the acrylic base I painted with a mixture of acrylic relief paste and wax. This was where I adjusted the color of the mask by adding some brown acrylic to that mixture. I put a lot of talcum powder before it was totally dry. Left it alone for about 15 minutes and then wiped off the talcum powder with a piece of soft cloth. So, there was some powder left around the eyes, mouth,.. giving the mask an old look..
11 replies on “Making of Adem”
Hi Yaz,
thanks for sharing the process! It’s nice to see that someone else is going to sew things together, I often do it so my own. But perhaps it’s a “girl thing” or so. I remember when I was I a kid I made little pillows and teddybears for my puppets since I enjoyed sewing so much….
We did you get your armature from? Or did you build it yourself?
I like how you did the weathering. – This is a great technique to keep in mind. It’s like we discussed on Shelley’s blog, the textures adding depth and growth to the single pieces. My favourite here is his shoes, well done!
Jaw dropped, then a huge smile here! Everything looks incredible, Yaz! AMAZING! I love the story of the mask and how its non-expression holds everything within it so perfectly. Any of the masks you made would have been truly wonderful as well, but knowing what you were trying to achieve makes the final one even better. And those clothes!!!!! Brilliant! Spectacular work!
Your friend & your fan.
PS: Your support crew is adorable!
Jessica, yes I like to sew things too 🙂 It seems better to sew than gluing where it is applicable. Yeah it is a girl thing I guess 🙂
I had my armature made in Turkey by a professional armature maker here. I wish I could build armatures like these.
Thank you for your comment about weathering and the shoes.
Shelley, thank you sooo much! I am glad to hear you like the mask. And clothes… I hope I was able to weather those as you described. I really loved the result. Walnut Ink crystals are like magic. Looks like I am going to be using those a lot for other set pieces as well. Matte medium really gives volume to fabric. It turned out very well with Hakan’s socks too 🙂
Support crew.. yep.. she is growing up. If I keep working on this film for the next 2-3 years than she would be able to help me out for the set pieces 🙂 Even now she is dying to work on things but unfortunately I can not use those crumpled papers swaped with acrylic paint or little things she makes with playdough,in this film. Maybe I should make another film only with the things she makes before she is older.
I love the clothes! The puppet is top notch. You mentioned you might be able to share the pattern for the suite. Would you be able to send me the pattern for the suite? I am about to attempt making one for a small scale puppet/model myself. I have no idea how to approach it. This would be a great thing to have to get me started. the suite jacket is much like the one I wanted to make.
lovely work! 🙂
Hi Rich, thank you for your comment 🙂 I have just emailed you the patterns. (to your email account recorded here) Let me know if you do not receive. Best, Yaz
wHERE HAVE I been!!!!??
I got a new computer at home…and I think i bookmarked one of your posts instead of your site…
Dangit!!
well….its so cool to see all of the amazing progress…you have made.
officially inspired!!
jriggity
Justin !!!!! GREAT to see you back here. Thanks a lot for the comment. I was away for a while.. not completely just physically. But after that I have been fully concentrated and working. It is a great feeling.
I really liked his work, the idea of the fantastic tree.see also my projects
Hi Roberto, I am sorry for the late reply. Thanks for visiting my blog and your nice words. I have just reviewed your facebook page and your animations. Great work and good luck!!
Hello! Absolutely love the work you have done. I hope you still check this as I would love any patterns you might have for pants and a shirt/jacket. It’s so hard to find patterns for models! Thank you so much! A.
Hi Ashley, sorry for the very late reply. Thanks for visiting my blog. I quit working on this film a while ago and unfortunately I dont have any more patterns. Please let me know if there is anything else I can do for you.