Bird armature for Kush:

Kush is an eagle like bird living on top of the tree of life… When I first started working on the bird armature, I thought I could go away with a complete wire and epoxy one. But, I want her to fly, land, shake her head,… So, especially her shoulders needed to be strong to stand all different movements of the wings. I ended up starting to make ball joints… You see Kush’s bird armature drawing below:

Go to downloads page to view larger size of this drawing. I changed proportions and legs while I was making the armature.
To draw this armature, I spent many hours on the net studying birds. Here are some of the links I find usefull:
http://people.eku.edu/ritchisong/554notes1.html
http://people.eku.edu/ritchisong/554notes2.html
http://people.eku.edu/ritchisong/554notes3.html
http://www.ornithopter.de/english/herzog.htm
http://www.lizkay.com/Studio/wingtutorial.htm
Here is a picture of the bird armature from the movie “War Eagles” which was also helpful to me.

Back to my bird armature drawing… There are 2 ball joints on the shoulders and 2 other on the legs. I cancelled the ones on legs later because the size of the bird is too small to add 2 more ball joints with steel rods. So, my whole ball joint production process was for only 2 and I spent about a month to gather all the materials, some machinery just enough to make something okey and some experience of working with metals. I was planning to work on ball joints for my next film but its good that now I have already some experience on making these.
MAKING BALL JOINTS WITH LIMITED MACHINERY

What I have:
A regular power drill (not a drillmill) with cobalt bits
Dremel 300 multi tool
Butane mini-torch (Dremel Versatip)
Vice
Materials:
Brass block
Stainless steel balls (5.5mm)
Motor oil
M3 12 screw & nut
Silver solder
I am not going to post a tutorial about making ball joints here as I am not very experienced about these. I listed what I have above, because if you are not able to get professional machinery and equipment and still want to try making ball joints; you can go with something like what I have.
Making ball joints for the bird armature have been the hardest part for me since I started stop motion. I tried cutting different metals with no success. And drilling balls… oh… it was something. After many trips to hardware stores here and in Istanbul, talking to many people working with metals finally I was able to find the kind of brass I could cut with Dremel and drill stainless steel balls with a regular drill. I also found some M3 screws as I needed small ball joints and M4 ones were too big.
Here are some great tutorials you can follow to make ball joints:
Lio’s tutorials:
Open Hole Double Ball Joints:
http://www.stopmotionworks.com/ohspics.htm
Drilling Metal Balls:
http://www.stopmotionworks.com/drlballs.htm
Brazing Balls onto Rods:
http://www.stopmotionworks.com/ballbrz.htm
http://www.scarletstarstudios.com/blog/archives/2007/04/new_armature_th_1.html
http://www.scarletstarstudios.com/blog/archives/2007/04/drilling_balls.html
http://www.scarletstarstudios.com/blog/archives/2007/04/drilling_balls_1.html
http://www.scarletstarstudios.com/blog/archives/2007/04/sandwich_plates.html
http://www.scarletstarstudios.com/blog/archives/2007/04/brazing_and_shi.html
http://www.scarletstarstudios.com/blog/archives/2007/04/improving_the_n.html
http://www.scarletstarstudios.com/blog/archives/2006/06/how_to_make_a_b.html
http://www.darkstrider.net/ball_jig.html
http://textbookindustries.com/armatures.html (scroll down to see his drilling jig)
Just follow these tutorials and try your best with what you have. Never give up trying and never think that you can not do without professional machineries.
At this point I would like to share with you a trick to drill steell balls. Even if you have the right machinery and tools, it is still hard to drill the balls. Thanks to DADAS here in Bodrum Sanayi who told me this trick to make the steel balls SOFTER.
ATTEMPERING STEEL: MAKING STEEL BALLS SOFTER TO BE ABLE TO DRILL

Get a big metal pot. Fill it with plaster. Put a stone (heat resistant stone for brazing – I have 2 from our fireplace) on top of the pot. Place the steel ball. Get your torch and heat up the ball until it is totally red. Then drop it into the plaster immediately. Make sure it goes down into plaster and do not get any air/oxygen. Wait for some time until the ball is cold. Take it out and you have a softer steel ball !!! Dont worry it is still very hard and you will spend some time and effort to drill it.
If you are having hard time drilling the balls, try this process. It works great!!!
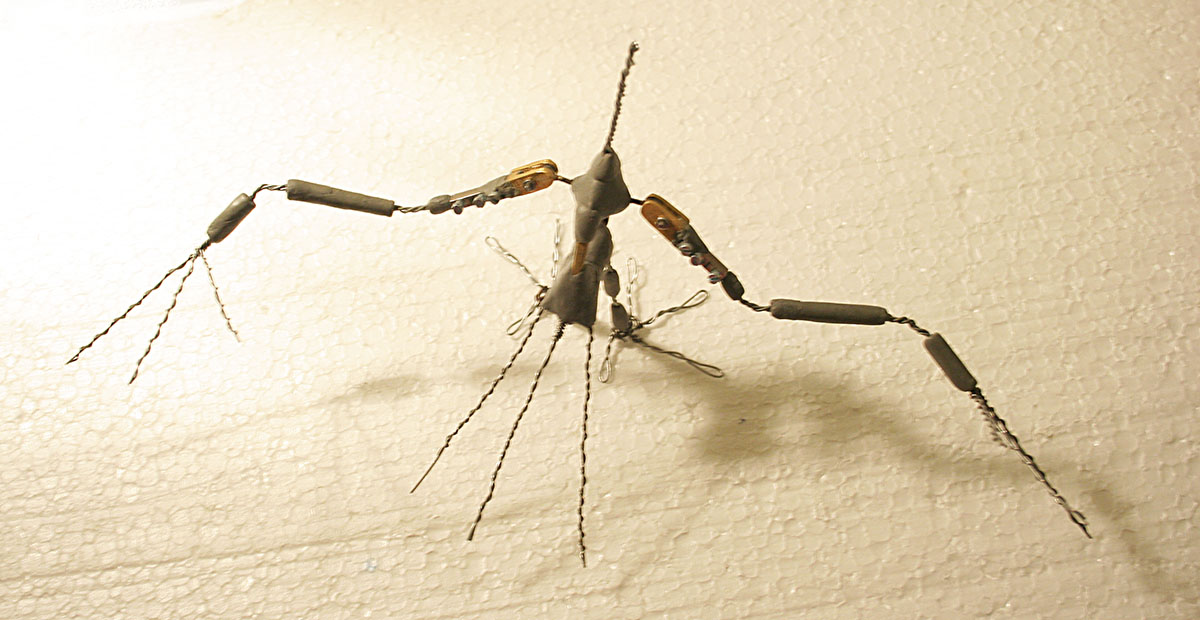
TORSO, LEGS, TAIL AND NECK OF THE BIRD ARMATURE

Above photos are self explanatory. Cut the brass into body shape. Drilled holes for the neck, legs, wings and tail. Used 5 min. epoxy putty to fix up connection points and to make the bones.
WINGS OF THE BIRD ARMATURE

There is a ball joint connected to wire for each wing. I drilled 2 small holes on the back of ball joints to connect wires. Wings need to be fully closed on some of the shots. It is impossible to fully close the wings when there are wires on the joints. So I made each wing 2 parts. You see the white plastic parts above. There are metal parts inside with 2 screws. I used these to make the second part of the wing detachable. So, when I animate, I will close the wings as much as possible then take off the second parts and have only the first parts as a closed wings. This will also allow me to replace a wing if it breaks. I will keep this in mind when covering the wings with feathers.

I will put some rigging points and the bird armature will be ready to go for feathers. The head will be made out of super sculpy and I will use liquid latex to cover legs and fingers. I will post all when I complete..
15 replies on “Making of a Bird Armature”
Jaw open.
YAZ! I can’t believe you’ve done all this! All I can think of is how beautiful the Kush puppet is going to be by your talented hand!
Can’t wait to see how the joints work when you animate!
I’ve decided not to get into the metal work. I am too nervous to use things that heat. I can’t even have lit candles in my home without worrying. So to see you so brave is amazing! I’m going to try everything I can to make my armatures with cheap easy materials but I am aware the positions will not likely hold as well as yours will.
I think you look beautiful and smart in your safety gear! Way to go!
And blessings upon our husbands!!! They suffer so much for our art! Bravo to Hakan! You are a true patron of the fine arts.
Wow Yaz, this is incredible!!! From the few pics you posted at the message board, I didn’t realize the full extent of what you’ve accomplished, and with just a few hand tools!!! I’m seriously impressed!! You’re forging this little creature from simple materials, learning new skills and solving seemingly insurmountable problems along the way!! Isn’t it exciting?!! It certainly is exciting to see you doing this!! It’s like alchemy… as you perfect your skills and your creation you must also perfect yourself along the way.
I especially like the idea for dropping a red hot steel ball into plaster… I’ve never heard that trick before.
Shelley, thank you very much!!! It has been a long and tiring process to try making ball joints and shaping metals. I did not think it was this hard before I started. I will test its flying today and hopefully post a video here. I understand your decision about not getting into metal work for the armatures. Now, I am writing you this messages with my 2 thumbs burned 🙂 Not so bad though… I am sure you will make great puppets with wire or ready made parts. And you would animate PERFECTLY like the way you wanted… Shaping a metal is a different feeling. You have this very very hard thing in front of you and seeing it change really makes you feel strange. You know, you do not need to get into heat/brazing process. If you have not done before, I would definetely recommend you to work with some metals to get that feeling as an artist. I can not imagine how wonderful things you can create out of metals with your talent!
Mike, thank you very much for your message. Welcome to my blog!! It is great to get a comment from you here. Yes, it has been very exciting to try making the things I have never done before since I started stop motion. Especially this bird’s armature has taught me a lot! I LOVE your message “It’s like alchemy… as you perfect your skills and your creation you must also perfect yourself along the way.” What a great observation to summarize stopmotion as an art form! Since I started stopmotion in last August, there were times I thought about giving up. One was a short time ago… when I was working on the roof all inside dust, a respirator and glasses on my face in a beautiful spring day trying to cut, drill with no success… I asked myself -what am I doing here.. go out, swim, put some clothes and makup on,.. have fun 🙂 All you are trying to do here is just for a 2-3 min film…….. That day I spent all day long on the roof and at the end of the day, I had a new working ball joint.. Yes, learning.. not just how to do things… Thanks again Mike! I appreciate your support!
Yaz, your progress looks terrific. It is good to meet you, I am John, known as castlegardener on the forums. You skills are improving with every new piece you finish. The tree looks amazing with all the leaves, as does the steps. I really appreciate the attention to detail you are putting into this production. Welcome to the world of stopmotion.
John, it is great to meet you here!! I know you from forums and your blog. I have been following your posts, your films and learnt a lot. Thank you very much for your message. World of stopmotion… it looks like I will be spending many years of my life here in this wonderful world.
“…as you perfect your skills and your creation you must also perfect yourself along the way”
So true, so true. A crucible of the self. Greater grit, concentration, and determination, all to make a world come real.
This is why I adore you and Mike.
The world of stopmotion….
Interesting to hear that term come up just now… it’s one I’ve been thinking to myself each time I do my practice sessions. The basement around me gradually transforms as I one by one plug in my set lights (which are halogen, and have a different look than the basement lights) and then switch off the overhead ceiling light. Now everything looks different… I can no longer see the mess all around me, only the set and my computer station, with my puppet featured center stage in the spotlight. This is when I’ve entered the stopmotion world.
Oh, and the TV goes off and I switch on one of my favorite iTunes playlists.
Shelley!!! I am grateful having you as a friend, a teacher.. Thank you!!
Mike, after reading your comment, I really want to finish puppets and set building asap and get into that world immediately. It should be the most amazing part of stopmotion process!!!
WOW!!
Very very impressive YAZ!
I know what it takes to dive into this COMPLEX world of stopmotion knowing nothing about so many parts of it……..I have HUGE Respect for what you made.
keep it up….one day at a time and youll be there.
jriggity
Justin thank you soooo much!! Yep, one day at a time… There is so much to learn, experiment. I love your quote on forums: “hardwork is the easy part”
WOW!! THAT IS A LOT OF WORK!!
I am amazed! I haven’t even started to think about the external armatures I need to make yet, but you’ve certainly made the whole thought of it daunting… well done! I can’t wait to see Kush finished. Are you going to be making more than one version?
So amazed…
As for me, I have finally got a blog post up with pics of the Log Cabin set interior, though there is still much to do on it, and the exterior to finish. Somehow I think I’m going about all this backward.
::shrugs::
DJ
(and Jed) :0)
Hi DJ,
I have been working on Kush, putting feathers, making head, claws for the last couple of days… Today, I have spent all day long and now I feel so tired and wanted to get some break. So, finally checking my blog, emails, etc..
Thank you so much for your comment. Yes, it has been a lot of work I have put on this bird. You know this is my first time of everything in stopmotion. Next time, things will go faster after learning, experimenting on this film. I am making only one version. I think it will be enough for the type of animation I will be doing.
I am now going to check out your blog. It is great to hear that you finished interior of the Log Cabin.
Best..
Yaz – thank you so much – I’m about to start on Fawkes the Phoenix (static thank heavens) and your website has given me so much inspiration
Hi Sandi, sorry for the late reply and thanks a lot for your comment!
[…] Click here to view bird armature making process of Kush. […]