After my previous post, Shelley suggested me to try using Walnut Ink to get a better aged look. It seems like walnut ink is such a nice paint to use for aging but unfortunately, I could not find it here… So, I wanted to try shoe polish.

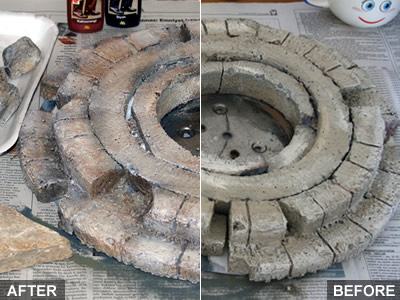
I first painted with a brown shoe polish. On my other hand, I had a piece of paper towel and wiped spots where there was too much paint. Before brown is dried, I painted with black shoe polish only the parts I wanted to be darker. Then I took a large, clean, dry paint brush and brushed all around to get a more natural look. The last thing was taking a small amount of white acrylic paint and rubbing the parts with a piece of foam where I wanted highlights . Here is the result… what do you think?

7 replies on “painting stones – 3”
I’m honored that you would check out my suggestion, Yaz. I think your shoe polish idea is excellent. I can’t enlarge the photos above but from what I can see, it seems to have more dimension now. If it were me, I’d want the warmth of the brown polish to be toned back a bit but I see from the bit of real stone peeking in the lower left hand corner (? is that your reference stone?) that the stone you are trying to emulate does have those warm tones in it.
Are you happy with it? If you want, you might, if you haven’t done already, to mix the brown and black polish (more brown than black to darken the brown) and apply it to just certain edges to add even more depth of age?
Patinas are my favorite thing! Great work!
Oh, yeah, love the little mug or bowl face in the corner too! hee.
Shelley, I would always love to check out your suggestions. You are my tree teacher, you know 🙂 I am happy to see the ruins looking more natural compared to previous look. The real stone on the left bottom is my reference one. My ruins look darker than that but thats okey I think. I will have a darker set. I will also try mixing brown and black for more depth as you suggested. But, I prefer to wait for now. There will be a rusted clock on top of this thing. So, after I place the rusted part, I can adjust the coloring more. Thanks again 🙂
By the way I use that smiling mug on the right top to wash my brushes. I like how it smiles on the edges of my process pictures 🙂 hehehe
Hello, I just found your site and am looking forward to reading more of it. I’m going to be staring in a stop motion movie soon and am really looking forward to it, though I hear I will be having to stand around a lot. Please come say hi and have a look at our making of it blog.
Cheers, Jed Bramwell
Hi Jed, glad to see you here! You know it is great to hear something from other people around making stopmo films. I am going to be shooting a very short movie; I started months ago but I kind of go slow,.. still the set in progress. There is a lot to learn and experiment. I was going to post the latest clock pictures and seen your comment. I have seen your blog site and everything looks great!!! I am now going to spend some time reading your blog. Cheers!!!
Hi Yaz,
I just posted my replies to you on my page thinking you were on blogger, but you probably won’t see them unless I tell you about it. So here’s me, Jed Bramwell, telling you that I posted responses to you on my blog!
And thanks so much for stopping by! I will for sure be stopping by yours a lot, but for now I gots ta get me some beauty sleep.
Jed xo
Thanks.. Received your responses. Have good sleep. zzzz